30 Hour Sous Vide Eye of Round Roast
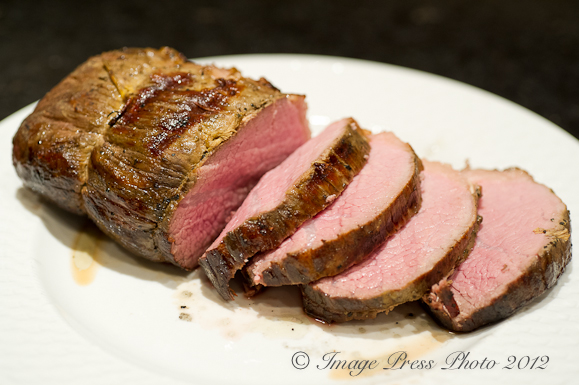
This post may contain affiliate links to products we use and love.
My husband Roger has written this post about our experiences cooking with the PolyScience Sous Vide Professional Chef Series. He has been the scientist behind all the madness in preparing and cooking foods by this method in our kitchen and he’s the analytic and mathematician in our family, so he’s here to explain the scientific aspects of cooking sous-vide.
Sous-vide (cooking foods in a vacuum sealed bag at low temperatures in water) has become all the rage. Most restaurant chefs and now many home cooks are discovering the benefits of this slow cook method. Chef Anthony Lamas a of Seviche, A Latin Restaurant, located in Louisville, Kentucky, recently said many people are using sous-vide just because it is the cool new kitchen tool. He said that sous-vide has its place and it should be selectively used in situations where it will improve the food.
With that in mind, I decided to experiment with sous-vide. I am a bit of an analytic so I knew I would come up with something that would appeal to engineers our readers and provide some very useful guidance.
One of the biggest benefits of sous-vide is that it allows you to slowly cook food to a precise temperature. Its not over-cooked or under-cooked. Cooking times are less precise as the food is brought to the exact temperature using the water circulator and then held at that temperature for as long as you leave it in the water bath.
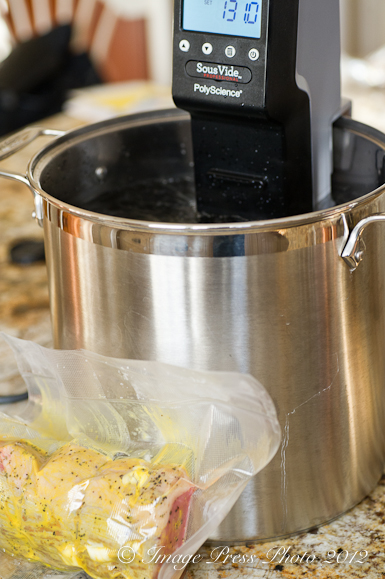
Beef Eye of Round Roast ready to go in the sous-vide water bath
All foods have different cooking temperatures in sous-vide. Here are the cooking temperatures for the water bath, which is also the final core temperature of the meat:
Short ribs medium 140° F
Roast beef medium 131° F
Tenderloin medium 142° F
Pork Tenderloin medium-rare 140° F
Salmon partially cooked 115° F
Flounder medium 117° F
Chicken 165° F
Sous-vide allows you to precisely achieve and hold the specified temperature. It is also easier to obtain very specific temperatures even up to 1/10 of one degree. Can you imagine trying to check the core temperature of a piece of flounder?
The other advantage is the longer you slow cook certain meats, the more tender they will become as the cooking time breaks down the collagens (also known as the connective tissue) in the meat. After all, if 24 hour short ribs are good, 72 hour short ribs must be better, right? Well, that is what I wanted to find out.
I decided to test various cooking times to determine if there is a point where additional cooking no longer provides a more tender meat and if so, what is that cooking time.
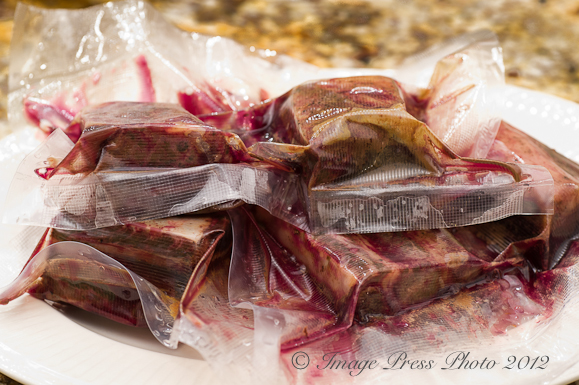
Three packages of short ribs that will be cooked for three different times
The verdict: Despite cooking the ribs 24, 48 or even 72 hours, the inside of the meat had a beautiful red center because of the sous-vide method. However, there were some differences. There is no question that cooking short ribs 24 hours in sous-vide provided a tender and perfectly cooked meat. At 48 hours the ribs continued to become more tender, however, we noticed that they seemed a little drier. At 72 hours the short ribs were definitely on the dry side. Yes, they were very tender, but we found that they required a sauce to supplement what we perceived to be a loss of moisture. This seemed odd since the meat is cooked in a sealed bag. Why would the meat become drier if the moisture could not escape the bag?
Okay, this really had me intrigued. A mystery to be solved. So, with pencil and graph paper in hand, I headed to the internet to find the clues.
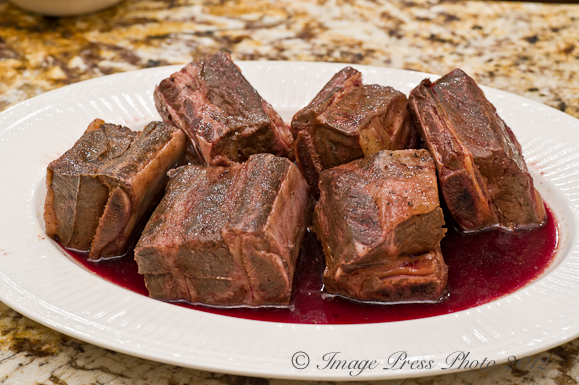
Short ribs that were cooked for 48 hours were more tender but seemed less moist
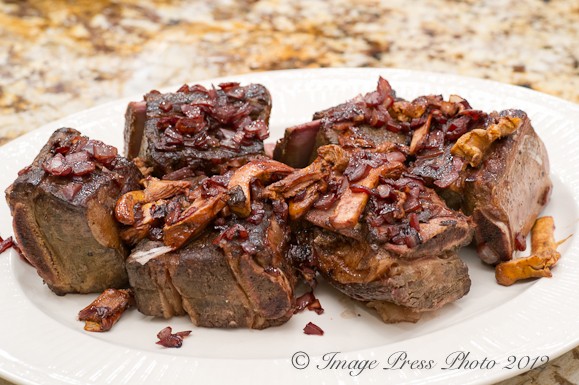
Short ribs cooked for 72 hours were very tender but were on the dry side
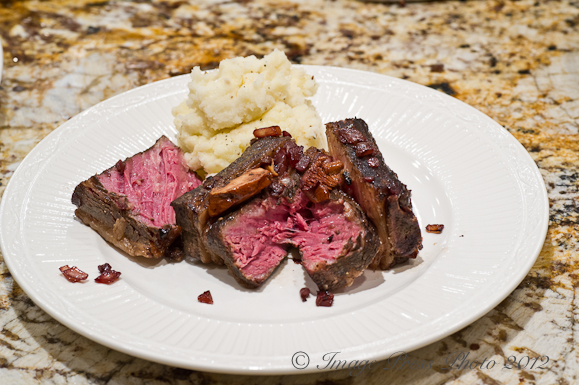
All of the short ribs were cooked to this temperature but the longer they cooked, the drier the meat became. Shown above, 24 hour sous-vide short ribs.









I WONDERED what Mr. B. was going to post about!
Great job, Mr. B.! I love me some good science with my food. Truly, I do! It’s why I love to read Cooks Illustrated: I want to know why and how!
I wish I had a sous vide!
Hi Susan,
I also enjoy the science behind the Cooks Illustrated recipes. Mr. B is really into this stuff, so I am sure that’s why he is fascinated with the sous-vide.
While he has made it quite scientific, you can also prepare foods quite simply by sous-vide method. It will be interesting to see if this becomes a fairly common kitchen item for home cooks.
Gwen
What a great experiment! I was hoping when I started culinary school I’d get to play around with it a little, but they don’t have the equipment to do it. Maybe one day…
Hi Jen,
This would be a perfect tool for a cooking school, depending on what you are learning. I do hope that you have the chance to use one someday to see the difference in the way it can prepare foods.
Gwen
How did school go ?
I want one !! This is a way cool piece of equipment.
First, I have to say, “What Susan in the Boonies said”!
Loved this article, the photos and descriptions made me drool and crave meat (though I am vegan!). Really liked the descriptions. Great article. Hope Mr. B comes back for another guest spot.
And, one more: Is there a way that I can get on your list for your leftovers? 🙂
Hi Marie,
We are happy to share leftovers! We always seem to have way too much food since there are just two of us and all of this cooking.
I am sure Mr. B will be back for another guest post. A girl needs a break sometimes, so I am happy to let him fill in. 🙂
Gwen
As a vegan you might be interested in knowing that the technique can be used, with a little modification, to cook veggies and the result is outstanding. See this wonderful article: http://sousvideresources.com/2016/10/07/vegetables-key-key-vegetables/
Boy you have a taken a cutting edge cooking technique to new levels. I had no idea that you sous vide required so much time. Even more surprising is that it bodes well for those looking to consume leaner meats. Maybe sous vide will make leaner cuts more trendy. The results must be amazing.
Hi Christine,
Yes, cooking meats takes a bit of time, but as you can see, the results are pretty spectacular. Other foods, like fish, can be prepared much quicker. See this post about Sous-Vide Salmon https://www.pratesiliving.com/2011/09/sous-vide-salmon-polyscience-sous-vide-professional/.
We have tried some veggies and a few other dishes. I am sure Mr. B will be back with another post and some additional recipes.
Gwen
Actually, this is all quite fascinating… your experiments taught me things I never would have thought of. I would have imagined that sous-vide would keep the moisture in but I never thought of the changing chemical reactions. Cool! I love Mr. B as guest poster: he’s funny and informative and the food looks delicious! Come back again soon, Mr. B!
Hi Jamie,
I am sure that Mr. B will be back soon and I am glad that you enjoyed his post. 🙂
It is fun to learn about the chemical reasons why the meats turn out the way they do. We never knew preparing food in a hot water bath could be so technical, huh?!
Gwen
You’ve gone molecular! Well..Mr. B has. I love it! I’ve been dying to try the sous vide method, but the equipment is just too expensive. However, I think that’s the best looking roast and short ribs I’ve ever seen! Perfectly pink and juicy! Well done, Mr. Bunky!
Hi Lisa,
Thank you for your comment. Yes, Mr. B has gone mad scientist. It’s been very interesting getting to try all foods prepared sous-vide.
We have more experiments planned, so stay tuned!
Gwen
What an excellent post by Mr. B. Watch out Gwen Mr. B’s gonna give you a run for your money in the kitchen 🙂
I have no experience with sous vide but see that it has become all the rage on blogs, restaurants, everywhere.
chow 🙂 Devaki @ weavethousandflavors
Hi Devaki,
Yes, sous-vide has become very popular. Not everything is made better by cooking this method, but I know that chefs and home cooks are trying all sorts of things out in the circulator.
As you can see, it definitely has the ability to improve certain cuts of beef and we are definitely sold on that along with a few other meats and seafood.
Mr. B will be back for sure!
Gwen
We have been playing with sous vide on our desert weekends as friends got a machine. The results are great, but I am not completely sold. It lacks a little heart and soul for my tastes! After all I love cooking. GREG
Hi Greg,
Mr. B has done much of the cooking with the sous-vide (as you can tell). I do enjoy the results, particularly with meats, but I also like the old fashioned way of cooking, too. It is nice when having company to be able to keep things at a steady temp without overcooking. I do like that feature.
Gwen
Super experiment I say! Looks absolutely divine.
I have been wanting one of these for a while now, mostly because the photos of everything I see cooked with the sous-vide look so incredible. And Mr. B did a great job explaining the science behind the methodology. He gets an A in my book. You both get an A for presentation as your roast looks soooooo good!
Just received my Poly Science early this past week. Over the years I have had some really terrible Eye Round Roast. This was my first use of the PS and must say the results were absolutely outstanding. Perfect medium through and through, cut with a fork tender (almost like a filet) and amazing flavor. Four thumbs up. Looking forward to further adventures. Significant kitchen investment that will truly pay off!
Hi Lane,
Thank you for leaving a comment and I am so glad to hear of your success! It is pretty remarkable how a cheaper and less fatty cut of meat can turn into something really delicious by using the sous-vide. I totally agree about having terrible round roasts when cooked by other methods. The meat is chewy and tough. This changes the way we now look at certain cuts of meats and grass-fed beef.
I know you will enjoy experimenting. We did one other post so far on some of our experiences with sous-vide
https://www.pratesiliving.com/2011/09/sous-vide-salmon-polyscience-sous-vide-professional/. We will be doing more in the future.
Gwen
I am planning to purchase one of the poly-carbonate food bins (9″ deep) that PS mentions on their site along with a lid from a local restaurant supply house and will notch it to fit the PS Professional – $13 vs. $31 for the lid is a much better deal. I have also been looking toying with making fresh cheese and am thinking that the sous-vide would provide very helpful precision temp controls needed for some cheese along with more “gentle” heating. Also purchased “Beginning Sous Vide” by Jason Logsdon as an eBook – seems to be a great resource for the newbie.
Hi Lane,
We use a large stockpot and cover it with plastic wrap. While it is not fancy, it seems to work well and maintain temperature. We will have to take a look at that book you suggested. We have not purchased one yet.
If you do start making some cheeses, I would love to hear how it all turns out.
Gwen
I use my cheap $25 Analog 5 qt Hamilton Beach Crockpot, and bought the DorkFoods DSV Controller $99 on Amazon.. Plug the Crockpot into the controller, put controller probe into crockpot… works Awesome…
I made a cheap rack out a $1 lid holder rack from the Dollar Store.. I can bend it according to the meat I make… and make sure to leave paths for the water around the meat.. then use a couple pipe cleaners to attach the probe to the rack so it’s suspended in the water.. not touching anything… Even without a Circulator, it all turns out evenly cooked….. I use it for Meat only… Pork loins were my bane before.. many dry ones.. Now PERFECT.. Steaks… Med Rare-Rare Perfection….
Right now I’m doing a 3 ½lb Bottom Round Roast like a Prime Rib .. $9.98 on Sale from Winco. .. After being coated in kosher salt in the fridge for 36 hours.. Sear it.. Coat it in herbs spices, Seal it… Sous Vide it at 131 Degrees 24-30 hours for Med Rare . Then Coat in herbs and put in oven at 400 for 10-20 minutes.. or 450 for 5-10 minutes…. Or do as I do.. and use my BB&B Chefs Torch .. to let my inner Pyro have some fun… :0)
Better than 80% of any Prime Rib I’ve had for 1/2 to 1/3rd the price..
MUST be an Analog Crockpot with Off / Low / High knob.. Digital wont work as it would not restart when the Dorkfoods controller cycles the power to the crockpot….
I have been cooking with my sous vide set-up that uses a 7-qt Rival Crockpot for many months now and have learned some things. Most important: expelling air is useful, but vacuum seal bags are for preservation after preparation and do little to aid in producing healthy and flavorful foods if the food is not being stored. This applies to a maximum temp of about 145-150 degrees; ziplock freezer bags soften at temperatures above this.
Next, as for drying: fats slowly render and dispel, leaving behind a powdery textured void. You can prove this by failing to trim fat from beef and cooking for long times. The changes to fats influence the dryness more than the changes to proteins (in my opinion) when trying for tenderness with normally tough cuts. Heavily marbled and tender cuts suffer most from this problem, so don’t cook ribeye for the 24+ hour tenderizing treatment. Reserve the long cooking times for very lean and tough cuts where you would prefer dryness to toughness, like London Broil and eye of round.
Finally, if you are looking for the most tender medium rare steak, allow the meat to cool several minutes before searing. The object is to avoid temperatures above 131 degrees F. Even after cooking sous vide you can easily overheat the meat if your core temperature is already at 131 F when you begin the sear. This applies to all meat textures.
And finally, there are some sous vide do’s and don’ts: don’t use fresh garlic, fresh herbs, or normal quantities of other aromatics in a sous vide bag for long cooking times. If you want fresh aromatics, use a reseda label bag and add them for only the last hour or two of cooking time. Whole or crushed garlic can seem rancid, and herbs can get overpowering in the bag for long times. The same applies for storage.
I haven’t tried this, but it is rumored that one can begin the tenderizing process on round steak, then after 18 to 24 hours at 131 F, if you ice bath and refrigerate the meat it will continue to tenderize without the heat during storage without further drying. Then back into the water bath to warm before searing. But I have pretty much decided that I’d rather go with a 24 hour 131 F supermarket tri-tip than any other cut of meat. Some prefer more fat, and insist on a ribeye, but I prefer lean beef over fatty cuts, and the tri-tip always pleases me.
I apologize for what my spell checker did to some of this text on submission. Re-sealable became “reseda label”, whatever that means.
Hi.
Thank you for the helpful and mouth-watering post! (I especially keep returning to that first picture…) I’m about to SV my first eye of round, and am seeing all sorts of times mentioned, from 8 to 30 hours or more, all with reportedly great results. So I’ll try 18 hours, somewhere in the middle; the hours are convenient. Good to be assured that SV is so tolerant of cooking times.
I have to question your chilling the roast before putting in the hot-water bath, however. I believe that would just prolong the time the meat spends in the danger zone, first while cooling down (and the bacteria won’t die during the chill), then again as the meat has to warm up all the way to cooking temperature, where it’ll finally pasteurize about 90 minutes later. No?
If I was searing first, I’d go straight from sear to hot water bath.
Thanks again,
Tom
Tom
Searing the meat prior to vacuum seal provides a lot of flavor during the cooking process, far more than you can achieve by taking raw meet with spices and cooking sous-vide. However, the meat needs to be below 38 degrees before you vacuum seal to prevent bacteria from developing during the cooking process. Therefore, it is recommended that the meat be placed in a bag, not sealed, and allowed to cool in a ice bath until below 38 degrees. Then seal the meat.
I too have seen a lot of confusing articles on sous-vide. I worked with Polyscience to get this right.
Concerning the temperature. The longer you sous-vide the more tender the meat becomes as it breaks down the tissue, however, what we have learned is that the longer you cook the more dried out the meat becomes. The great chefs that we work with claim that for this cut of meat and Tenderloin, 36 hours is the best.
Another thing we learned is cooking the meat at 120 degrees for 8 hours breaks down tissue differently that a straight 131 degrees. What I now do is cook the meat at 120 degrees for 8 hours then 129 degrees for medium rare. Most sous-vide sites claim 132 for medium rare but I have found 129 is better. Everyone has their own preference so you will have to try it out.
I hope you find this helpful.
Hi Roger. Thanks for the feedback.
That’s an interesting twist on the “standard” way of doing SV that the introductory articles, eg Baldwin, suggest. If you’re cooking at 120 to start, I agree you’d want to be as bacteria-free as possible before sealing. And I assume that if you’re doing it that way, there must be a good reason, eg a better result. Ditto searing the meat before you cook. Once I get a little more experience under my belt, I’ll have to try it again your way; I’m intrigued.
BTW, my eye of round cooked at 134/56.5 for 16 hours came out wonderful – tender but not excessively so, in my opinion. (That’s using the cook-then-sear approach.) But I’m sure there are different grades of wonderful…
Thanks again,
Tom
Here is a video that uses a similar technique of chilling after searing. The only difference that I have added was longer cooking time to break down the protein and make it more tender and we tend to like our cooked more rare than they recommend. The chefs that we work with recommend 132F degrees. I still prefer 129F degrees but it is up to your taste.
http://www.youtube.com/watch?v=oKdDfunjYio
Roger, I believe that Tom’s concern about the chill after searing is spot on. You might recheck. Warming up (with the sear), then cooling down (with the ice bath), then warming up again in the water bath is extending the amount of time the meat is in the danger zone. I frankly can’t imagine why you would cool something down (which, as Tom points out, does not kill bacteria), when you’re about to heat it up.
Steve
Here’s Polyscience’s take on this.
Meat that is seared will boil if it is cryovacked and cooked in a hot water bath. The boiling will steam the meat and create a very different texture and taste. Therefore, to make the meat cook at an even temperature after it has been seared it is important to bring the temperature down.
Concerning the time it takes. Meat can remain at room temperature for 2 hours without growing bacteria. As long as you sear the meat, chill it and cryovack and begin to water bath cook the meat within this allotted time bacteria will not grow. the searing and sealing process usually only takes an extra 15 to 20 minutes. Botulism, which is the greatest concern with cryovacked meat will not present in this period of time unless you sear the meat and then cryovack and refrigerate for later sous vide.
Concerning the taste. I have used sous vide on meat by first searing and also by just cooking in the water bath without searing. I have found that the searing flavor penetrates deep in the meat when cyrovacked and sous vide is used and adds lots of flavor that is missing if I just “cook” raw meat that has been seasoned and seared after cryovacking.
I also know that most recipes and directions call for cryovacing seasoned meat but personally , I think the added flavor is worth the extra step of the water bath.
I hope you find this helpful and if you try the seared versus unseated please let me know your thoughts. We appreciate your comments.
I own a sous vide machine and that machine is awesome i make a eye round roast at temp 131 for 28 hrs and the meat was done to prefection med rare edge to edge that machine is great also made past in it to
I like the recipe, and I think your cooking time/temp is spot on, but I’m not sure what the searing before sous vide step is supposed to accomplish?
I sous vide cooked a bottom round roast for 48 hours @ 133 F. Very tender and also dry. I noticed a lot of liquid remaining in the bag. I should have weighed the liquid to calculate the moisture loss. It seems there must be a balance between tenderness and juiciness
Just got a ANOVA Precision Sous Vide Machine and am using it to do the subject recipe. Its only a few hours in at 133 F but after reading the above comments I think I’ll turn it back to 131 F for 24 hours. I had been using a temperature controller I made for about $40 to control a crock pot for Sous Vide it was very accurate and it gave good results even without the water circulator like on the commercial machines. However, the crock pot lacked enough capacity to do larger pieces of meat.
Although the author says: “I quickly seared the meat, placed it in a vacuum bag for sealing and cooled it in a ice bath (this is an important step to kill any potential bacteria on the outside of the meat prior to cryovacing)”, it’s not about that. Low temps will not kill bacteria, only slow their growth WHILE the item is cool. It’s about a “boil at room temperature” phenomenon that cryovac can do. What the cooling does avoid is additional dehydration. See https://www.youtube.com/watch?v=oKdDfunjYio where the PolyScience guy mentions it. And note that the cooling is done BEFORE sealing.
Lenny, the low temperature of the ice bath is to lower the meat temperature so that it doesn’t steam during the hot water bath. It has nothing to do with bacteria at this point. Steaming impacts the texture of the meat and if you start with meat that is already warm and them vacuum seal it, it will cause steam in the water bath.
That’s exactly what I was saying, that it’s not about bacteria. However, it’s also important to note that 131F or even 139F will not cause any steaming that would not occur via reheating TO those temperatures after being iced down. In fact, the searing heats the meat enough that the VACUUM causes such steaming. It’s not the immersion back into the 139F water that causes the steaming. Immersing the seared vacuum-packed would just be COOLED from its sear temperature by the 131F-139F bath. And if BEING AT 139F in its current vacuum would cause such steaming, it’d occur whether or not it had been iced.
Very interesting article. There is one glaring inaccuracy however. The advice that immersing the vacuum packaged meat in ice water will kill any “potential” bacteria just isn’t so. An ice bath may slow down the growth of bacteria but has no significant lethal effect on bacteria. With regard to bacteria versus “potential bacteria”; it is possible to kill bacteria but “potential bacteria” is a glaring misnomer.
In some of the comments section there are some comments that need to be addressed:
1. Clostridium botulinum bacteria will not grow above 122F. The spores will remain viable to well above the boiling point and can cause new growth when the growth media cools down below 122F. Botulinum toxin absolutely will not be produced at temperatures in sous vide cooking above 122F.
2. There are several comments regarding steam and steaming. Steam is water vapor released upon the boiling of water. Sous vide cooking for most meat products takes place 50-80 degrees F below the boiling point of water. Ergo, no steam. There may be some water vaporization and subsequent condensation, but no steam per se.
Very interesting article. There is one glaring inaccuracy however. The advice that immersing the vacuum packaged meat in ice water will kill any “potential” bacteria just isn’t so. An ice bath may slow down the growth of bacteria but has no significant lethal effect on bacteria. With regard to bacteria versus “potential bacteria”; it is possible to kill bacteria but “potential bacteria” is a glaring misnomer.
In some of the comments section there are some comments that need to be addressed:
1. Clostridium botulinum bacteria will not grow above 122F. The spores will remain viable to well above the boiling point and can cause new growth when the growth media cools down below 122F. Botulinum toxin absolutely will not be produced at temperatures in sous vide cooking above 122F.
2. There are several comments regarding steam and steaming. Steam is water vapor released upon the boiling of water. Sous vide cooking for most meat products takes place 50-80 degrees F below the boiling point of water. Ergo, no steam. There will be some water vaporization and subsequent condensation, but no steam per se.
For everyone’s reference, water does NOT boil at 212F, but rather at a temperature that correlates with the pressure. (Think “freeze-drying”.) In a vacuum, water CAN boil at, say, 131F. BUT(!!!), it’d boil at that 131F in that vacuum (so watch out for, say, a Cryovac CHAMBER sealer) even if it was iced beforehand.
Double-bag unless using a vacuum sealer! I left out the mustard, but otherwise sort of followed the recipe. Taste and texture were superb. My roast had a bone and lots of fat — I suggest trimming and boning (might want to tie it up with cooking twine). For a garnish, sauted mushrooms and made gravy (would have used juices from bag, but had some water infiltration, hence will double-bag next time). I did nor resear — color was fine.
Check out Nomiku (I am not affiliated). Sous vide made easy http://www.nomiku.com/
The secret to making this cut of meat as tender as possible, and at the same time as Juicy as possible, is to brine it (I used sea salt only) in a water bath in the refrigerator for 12 to 14 hours before cooking sous vide. This also adds an extra precautionary anti-bacterial aspect to the whole thing. After the brining period is over, rinse the meat under running fresh water, pat dry with paper towel (I rolled the meat up in paper towel and squeezed, carefully unrolled) and then proceed as outlined above.
I apologize, but I made an error in my comment just above. I forgot to mention that I did not sear the meat until AFTER the sous vide cooking process. I also did not add any condiments or pepper until after the searing. I do not prefer the taste of burnt pepper, my searing pot , an open cast iron dutch oven was smoking hot and contained 4 tablespoons coconut oil for the searing. I used the dutch oven to avoid the splatters searing meat can cause.
Unbelievably fantastic. Tried this last night with a 3.75 lb. eye of the round following the above directions to a ” T ” and after a 30 hour bath this normally tough roast was almost fork tender. The eye roast has bee a Sunday staple in my family for decades. I have tried this so many different ways… 30 minutes at 375 taken out of the oven and tented with foil usually cut like a pencil on the diagonal or putting in a 500″ oven and shutting it off for an hour or so.. nothing could tame this “beast” until now. Last night I cut/carved this directly across into 1/2″ slabs.
I will be trying this many times again using different seasoning methods. I may also just use my blow torch for the second sear as the roast was so tender the second sear stuck slightly to the lightly oiled cast iron dutch oven (used an above mentioned method to avoid splatters). I use the torch method with my steaks.
Thank you
Hi Jody & Eddie,
We’re so glad to hear you enjoyed the recipe! Thank you for leaving a comment.
Gwen
Nice article. I’m going to do this for my birthday, minus the mustard. Any other roast cuts that work this way. Last one I made was too a tad bit to rare texture wise for me but that looked great
Love all your sous vide articles, guys! So informative. Got one a couple of years ago, and am really starting to just get into it now. Did pork loin last week, eye of round last night…looking forward to short ribs next! Hope all is well, hope we have you back here on the ESVA for a visit soon – I’ll treat to ice cream! 🙂
Hi Laura,
Thank you. I’m glad you are enjoying the articles.
We’ll definitely plan a trip back to see you all soon and take you up on the offer! 😉
Gwen
Thank you for this recipe! I got my Mello sous vide unit and was dying to try something like this. I am new to sous-vide, but I’ve read a lot and felt ready. I followed your recipe, except for the temp I followed one of the other commentors and used 129 degrees for 8 hours and 21 hours at 133. It was absolute juicy, edge to edge perfection. It looked and tasted like tenderloin. My husband loved it. Wish I could upload a photo! Thank you!!!!
Fantastic insights! I’ve been meaning to get into sous vide, although i often do despise the trendiness of it all (you know, hipster culture and all that jazz). But this looks interesting. Thanks!
Could you, please, define “a quick sear?” Do I just heat the pan and roll the eye in it, or should I leave it searing for a few seconds, or minutes, on all sides? I’m just learning Sous Vide, and I want to make sure my meals are not going to make anyone sick! Some amateurs, like myself, are putting their recipes on line for others to follow. But, that scares me. They may not know anything about safe preparation and temps with Sous Vide, and be spreading dangerous info. I look for recipes like this one, made by people who KNOW, though, at 68, I don’t want new recipes, just the techniques. Thanks!