Tricolor Vegetable Pâté and Whole Wheat Bread for The Daring Cooks Challenge
For those of you that are not familiar with The Daring Cooks, this is a group primarily made up of food bloggers, that participate in a cooking challenge each month. There are both cooking and baking challenges each month for The Daring Kitchen and I am insane excited enough about all of this that I participate in both! This month’s cooking challenge was hosted by Valerie, from The Chocolate Bunny, and Evelyne, from Cheap Ethnic Eatz.
We brainstormed for a while before agreeing on what to throw at you guys. We wanted something suitable for June – so nothing too heavy, or too heat-intensive (for the North Hemisphere at least). In the end, we decided that this month’s challenge would be: pâté. It’s incredibly versatile, it has the potential to be beautifully presented, and it’s perfect for summer (think picnics in the park).
Now, since pâté is rarely eaten alone, we are adding a second part to this challenge: you will have to make a bread, to go with your pâté. We’ve included a really good recipe for French baguette. However, because baguette is quite time-consuming to make, and because we know that the Daring Bakers have already made baguette a while ago, we’re also giving you a quicker recipe for a sandwich loaf, which you can also choose to make as little rolls, with white or whole wheat flour. But really, we’re giving you free range for the bread part of the challenge: if there’s a daring bread recipe you’ve been dying to try, and you think it would go well with your pâté, go for it!

Thank you to both Valerie and Evelyne for thinking of something appropriate for the warmer months as well as coming up with a dish that most of us probably do not think of preparing often. Pâtés are lovely and impressive to serve, so I was off to make the first part of the challenge!


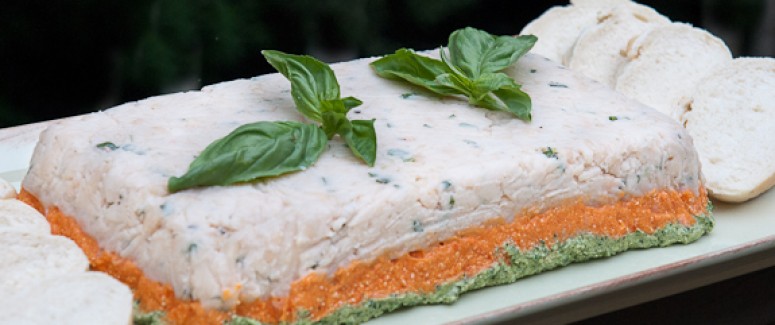
I immediately avoided the whole idea of a meat or fish pâté since I personally think it is pretty gross to whip up those types of things, but I was very excited to make the vegetable version! I was having company for dinner and thought it would be an ideal appetizer to serve on a warm summer evening along with a dinner prepared on the grill. I only made one change to the recipe for the pâté. I roasted my own red pepper rather than using the jarred ones. The flavor is far superior, in my opinion, and worth the extra prep time to make your own.


I did forget to freeze the pâté prior to unmolding it. I was running around like a chicken with my head cut off pressed for time before my guests arrived. I know that it would have been firmer, but the taste was fabulous regardless! This will definitely be a keeper recipe. It is also quite healthy, so it is a nice choice when you are trying to keep appetizers on the lighter side. I did serve mine with a French baguette and I would say that is the appropriate accompaniment when eating the pâté.
Note – You also might want to search for pine nuts of Italian origin for making the pesto (and other dishes that you prepare with pine nuts). There is something called Pine Nut Syndrome that occurs when some people consume pine nuts originating from China. Read this post by David Lebovitz. It is truly fascinating and you probably don’t want to get this syndrome!

The colors are so pretty!
The second part of the challenge was the one I left until the very last minute. I can tell you that I was a bit terrified apprehensive about this part. I missed last month’s Daring Baker’s Challenge for making a Croquembouche because I had golf balls cream puffs that did not rise due to altitude and humidity issues (I was in a rain forest at 4200 feet!), so I thought I would wait and make the bread once I was back at sea level.

Oh my, it actually is rising as it is supposed to!
Of course, that scenario did not occur, so I was left with baking yeast bread in the wet mountains with only a day before the deadline! I read all the tips for making adjustments that I could find online and in cookbooks. The common theme is that yeast will rise very quickly at a high altitude and then the dough will collapse, so breads are more compact.

Yay! It’s bread!
I decided to make a simpler recipe in case I had another baking disaster less than satisfactory outcome. I used the no-knead recipe for whole wheat bread on the back of The King Arthur flour bag. I went to their website and used every one of their tips for making the adjustments. Surprise! I had bread in just 2 1/2 hours and it was really good!
I did notice that is was pretty normal in size before baking (it seemed to rise properly), but it did shrink some in the oven. That was okay. The mission was accomplished and we got to enjoy some delightful homemade bread with my Strawberry Freezer Jam. This was a real treat!

Tricolor Vegetable Pâté and No-Knead 100% Whole Wheat Bread
Pâté – Yields one (10 by 5 inch) terrine or loaf pan
Bread – Recipe from King Arthur Flour
* This is the regular recipe and it has not been adjusted for high altitude.
Ingredients:
Tricolor Vegetable Pâté
White Bean Layer
2 – 15 ounce cans (900 ml) cannellini (white kidney beans), rinsed, drained thoroughly
1 tablespoon (15 ml) fresh lemon juice
1 tablespoon (15 ml) extra-virgin olive oil
1 tablespoon (15 ml) minced fresh oregano or 1 teaspoon dried
2 garlic cloves, pressed
Red Pepper Layer
1 large red pepper, roasted, peeled and chopped (use about 7 ounces of the pepper) or
1 – 7 ounce (210 ml) jar roasted red bell peppers, drained and chopped
3/4 cup (180 ml) crumbled feta cheese (about 4 ounces)
Pesto Layer
2 garlic cloves
1 cup (240 ml) fresh basil leaves
1 cup (240 ml) fresh Italian parsley leaves
1/4 cup (60 ml) toasted pine nuts, preferably of Italian origin (Noted above)
3 tbsp (45 ml) olive oil
1/2 cup (120 ml) low-fat ricotta cheese
No-Knead 100% Whole Wheat Bread
1 cup lukewarm water
1/4 cup orange juice
1/4 cup melted butter or vegetable oil
3 tablespoons molasses, maple syrup, dark corn syrup, or brown sugar corn syrup
2 teaspoons instant yeast
1/4 cup Baker’s Special Dry Milk or nonfat dry milk
1 1/4 teaspoons salt
3 cups King Arthur whole wheat flour, white whole wheat preferred (I used regular whole wheat flour)
Directions:
Tricolor Vegetable Pâté
Line your pan with plastic wrap, overlapping sides.
For white bean layer:
Mash beans in large bowl. Add lemon juice, olive oil, oregano and garlic and blend until smooth. Season to taste with salt and pepper. Spread bean mixture evenly on bottom of prepared pan.
For red pepper layer:
If you are roasting a fresh pepper, preheat your oven to 450 degrees. With your hands, grease the skin of the pepper with olive oil. Place pepper on a baking sheet and bake in the preheated oven. Check the pepper every 10 to 15 minutes and turn over as it starts to darken and blister. You want the pepper to be blistered all over. This should take a total of 30 to 40 minutes. (Alternatively, you can broil the pepper in the oven or cook it on the grill or in a grill pan.) Once the pepper is blistered all over, place in a sealed plastic bag for 15 minutes, until cool enough to handle. Remove the core and seeds, peel off the skin and chop the pepper.
Combine peppers and feta in a food processor and blend until smooth. Spread pepper mixture evenly over bean layer in prepared dish.
For pesto layer:
Mince garlic in a food processor. Add basil, parsley and pine nuts and mince. With machine running, gradually add oil through feed tube and process until smooth. Mix in ricotta. Spread pesto evenly over red pepper layer.
Cover with plastic wrap and refrigerate overnight. * If you freeze the pâté 30 minutes prior to serving, it will be firmer when you unmold it and easier to slice.
To unmold, invert pâté onto serving platter. Peel off plastic wrap from pâté. Garnish with herb sprigs and serve with a French baguette or sourdough bread.
No-Knead 100% Whole Wheat Bread
1. Heavily grease an 8 1/2″ x 4 1/2″ loaf pan. This loaf tends to stick, so be sure to grease the pan thoroughly with non-stick vegetable oil spray (I used unsalted butter).
2. Combine all of the ingredients in a large bowl. Beat the mixture vigorously for about 3 minutes; an electric mixer set on high speed works well here (you will need a heavy duty mixer for this). You should have a very sticky dough. It won’t be pourable, but neither will it be kneadable (it will be very sticky!). Scoop it into the prepared pan.
3. Cover the pan with lightly greased plastic wrap, and let it rise for 60 to 90 minutes; it should just about rise to the rim of the pan, perhaps just barely cresting over the rim. While the dough is rising, preheat the oven to 350°F.
4. Uncover the bread, and bake it for about 40 to 45 minutes, tenting it with aluminum foil after 20 minutes (the directions on the bag only said to bake the bread for 30 to 35 minutes, tenting after 15 minutes. I think that timing is more accurate, based on my experience and allowing for the adjustments). The bread is done when it’s golden brown on top, and an instant-read thermometer inserted into the center registers between 190°F and 195°F. Remove it from the oven, and after 5 minutes turn it out onto a rack. Brush with melted butter, if desired; this will keep the crust soft. Cool the bread completely before cutting it.